Getting Started with Transactional Emails
Transactional emails are automated messages sent to individual users in response to specific actions, such as password resets, order confirmations, welcome emails, and account notifications. This guide will walk you through setting up transactional email sending in Sender.
Before you begin, make sure you have verified your domain and its DNS parameters (SPF, DKIM and DMARC) in your Sender account. Click here for detailed instructions on how to do that.
Once your domain is verified, you can start sending transactional emails using either the API or SMTP relay.
Sending Emails with API
API allows you to send transactional emails programmatically. We support multiple programming languages and provide ready-to-use code examples.
Sender’s API documentation can be found here.
API documentation for sending an email campaign without a template can be found here.
Getting Started with API
- Navigate to your Setup instructions page in Sender
- Verify that your sending domain is authenticated
- Create an API token (if you haven’t already)
- Choose your preferred integration method from the available options:
- cURL – for quick testing via command line
- Laravel – PHP framework with built-in mail support
- PHP – native PHP implementation
- Node.js – JavaScript/Node.js integration
- SMTP – standard SMTP relay option
API Integration Examples
cURL Integration
The quickest way to test sending emails is using cURL. Copy the following command into your terminal:
curl "https://api.sender.net/v2/message/send" \
-X POST \
-H "Accept: application/json" \
-H "Content-Type: application/json" \
-H "Authorization: Bearer YOUR_TOKEN_HERE" \
-d '{
"from": {
"email": "gabrielle@sender.net",
"name": "Gabrielle"
},
"to": {
"email": "customer@email.com",
"name": "John"
},
"subject": "Hello from Sender!",
"html": "Hello, and happy sending!"
}'
Important: Replace YOUR_TOKEN_HERE with your actual API token, and update the FROM and TO email addresses. The FROM email address must match your verified domain.
Once you send your email, you can check the status of your message in Logs.
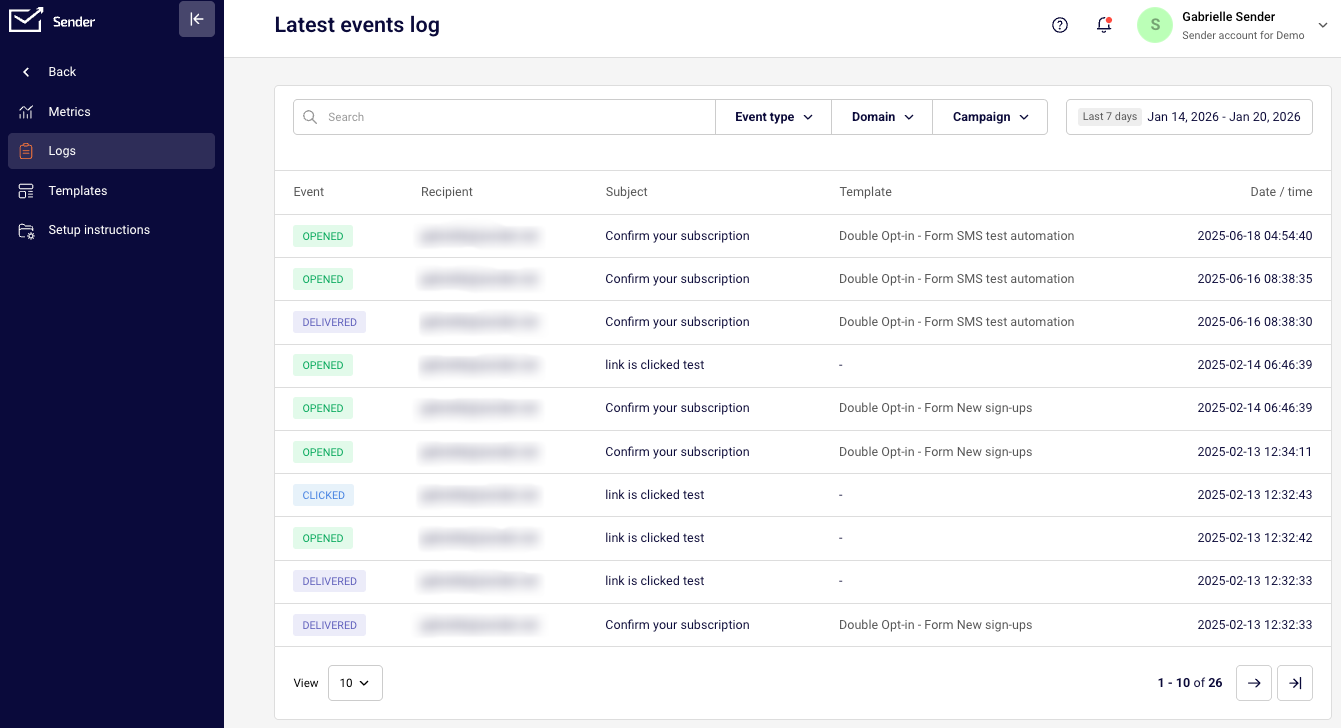
Logs can be filtered by event types:
- Emails sent
- Opens
- Clicks
- Bounces
- Unsubscribes
- Spam reports
You can also search for a log by email address, the sender’s domain and campaign name.
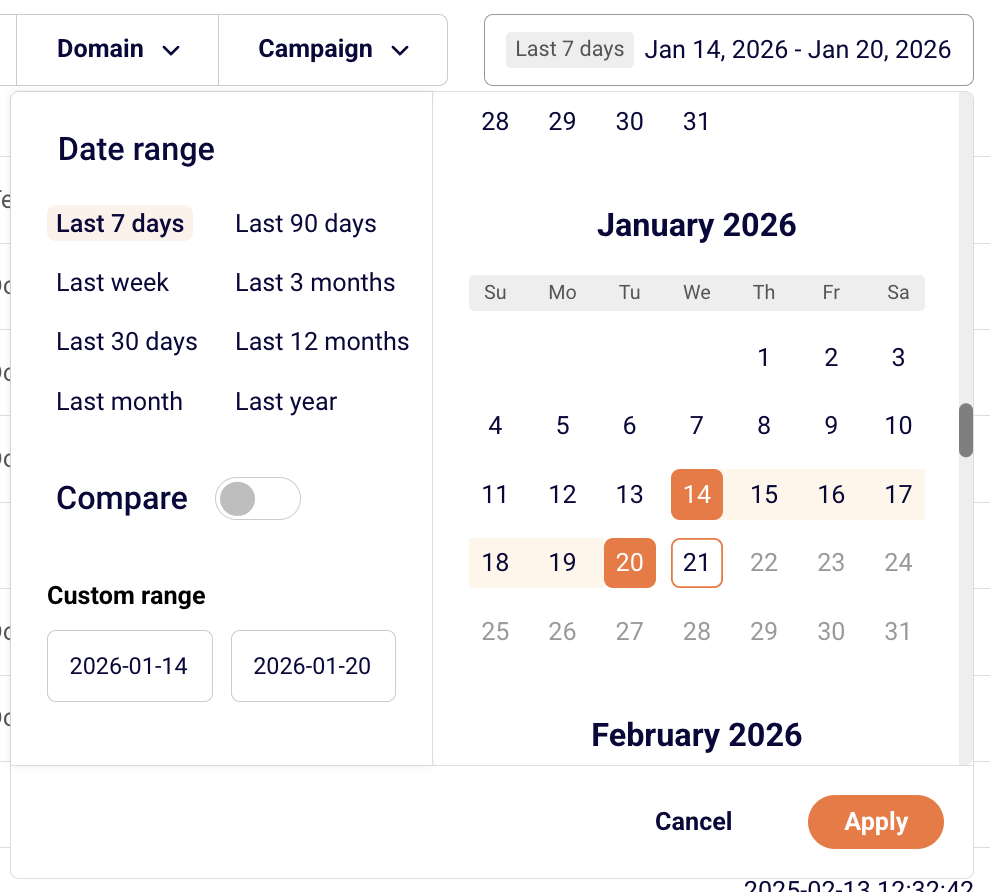
You can choose the date range for the logs that you are interested in.
Laravel Integration
Sender provides a Laravel mail transport package for seamless integration with Laravel’s Mail facade:
1. Install the SDK (auto-discovery registers SenderServiceProvider):
composer require sendernet/sender-transactional-php
2. Run the installer for guided setup:
php artisan sender:install
3. Configure environment variables:
SENDER_API_KEY=your_api_key
MAIL_MAILER=sender
4. Use Laravel’s mailing features as usual. Any
SenderNetRequestException
raised by the SDK is converted into
Symfony\Component\Mailer\Exception\TransportException
with the original message preserved.
PHP Integration
For standard PHP applications, install the recommended HTTP client and SDK:
Install the HTTP client and factories:
composer require php-http/guzzle7-adapter nyholm/psr7
Install the SDK:
composer require sendernet/sender-transactional-php
Example usage:
use SenderNet\SenderNet;
use SenderNet\Helpers\Builder\EmailParams;
use SenderNet\Helpers\Builder\Recipient;

$sender = new SenderNet(['api_key' => getenv('SENDER_API_KEY')]);

$emailParams = (new EmailParams())
    ->setFrom('gabrielle@sender.net')
    ->setFromName('Gabrielle')
    ->setRecipients([new Recipient('user@example.com', 'User')])
    ->setSubject('Welcome')
    ->setText('Thanks for signing up\!');

$response = $sender->email->send($emailParams);
Sending Emails with SMTP
SMTP (Simple Mail Transfer Protocol) is a standard protocol for sending emails. Many applications and content management systems support SMTP configuration.
Setting Up SMTP
- Navigate to your Setup instructions page in Sender
- Select the SMTP tab
- Click Create SMTP user to generate your credentials
You’ll receive the following information:
- Server: smtp.sender.net
- Ports: 25, 2525, or 587
- Authentication: PLAIN or LOGIN over TLS
- Username: (automatically generated, e.g., Gabrielle_e736w1)
- Password: (provided when creating the user; safe it as it will only be shown once)
Configuring SMTP in Your Application
Enter the following settings in your application or CMS:
- SMTP Host/Server: smtp.sender.net
- Port: 25, 2525, or 587 (choose based on your server configuration)
- Encryption: TLS or STARTTLS
- Username: Your generated SMTP username
- Password: Your SMTP password
Important: The from email address must match your verified domain.
Managing SMTP Users
From the SMTP Users section, you can:
- Edit user settings
- Regenerate password if credentials are compromised or you lost the password
- Delete users you no longer need
JavaScript/Node.js Integration
Here’s a complete example of sending a transactional email:
var axios = require('axios');
Configuration Parameters
URL Structure: Replace CAMPAIGN_ID with your actual campaign ID from your Sender account.
Authentication: Replace PLACE_YOUR_API_TOKEN_HERE with your API token, which you can find in your Sender account settings.
Request Body:
- to: Recipient information including email address and name
- variables: Custom variables that can be used in your email template (like firstname, lastname)
- text: The email content or a trigger for your template
All other available parameters can be found at api.sender.net.
API Features and Capabilities
Sending to Multiple Recipients
For individual personalized emails: Make separate API calls for each recipient to ensure personalization and privacy.
For bulk sending: Use Sender’s bulk endpoint to send to multiple recipients efficiently. Note that when multiple recipients are added to the same “to” field, they will be able to see each other’s email addresses.
Adding Attachments
You can attach files to your transactional emails by including file URLs in your API request:
{
  "attachments": {
    "invoice.pdf": "https://yourdomain.com/files/invoice.pdf",
    "receipt.pdf": "https://yourdomain.com/files/receipt.pdf"
  }
}
Attachment requirements:
- Files must be accessible via HTTPS URLs
- Maximum file size: 25MB per attachment
- Supported formats: PDF, Office documents, images, ZIP files, and more
Using Transactional Email Templates
Sender allows you to create and use email templates with your transactional emails for consistent branding and easier management.
API documentation for sending a transactional email with a template can be found here.
Creating a Template
- Navigate to the Transactional email overview page
- Create or select an existing template
- Complete the Settings, Design, and API steps
- In the API step, select your preferred programming language (JavaScript, PHP, or Python)
Template API Examples
Each template has a unique campaign ID that you’ll use in your API calls. You can find this ID in the API example section of your template.
The API example section provides language-specific code examples with your template ID already included:
- JavaScript – Using axios
- PHP – Native PHP implementation
- Python – Using requests library
Important: Replace PLACE_YOUR_API_TOKEN_HERE with your actual API token in the code examples.
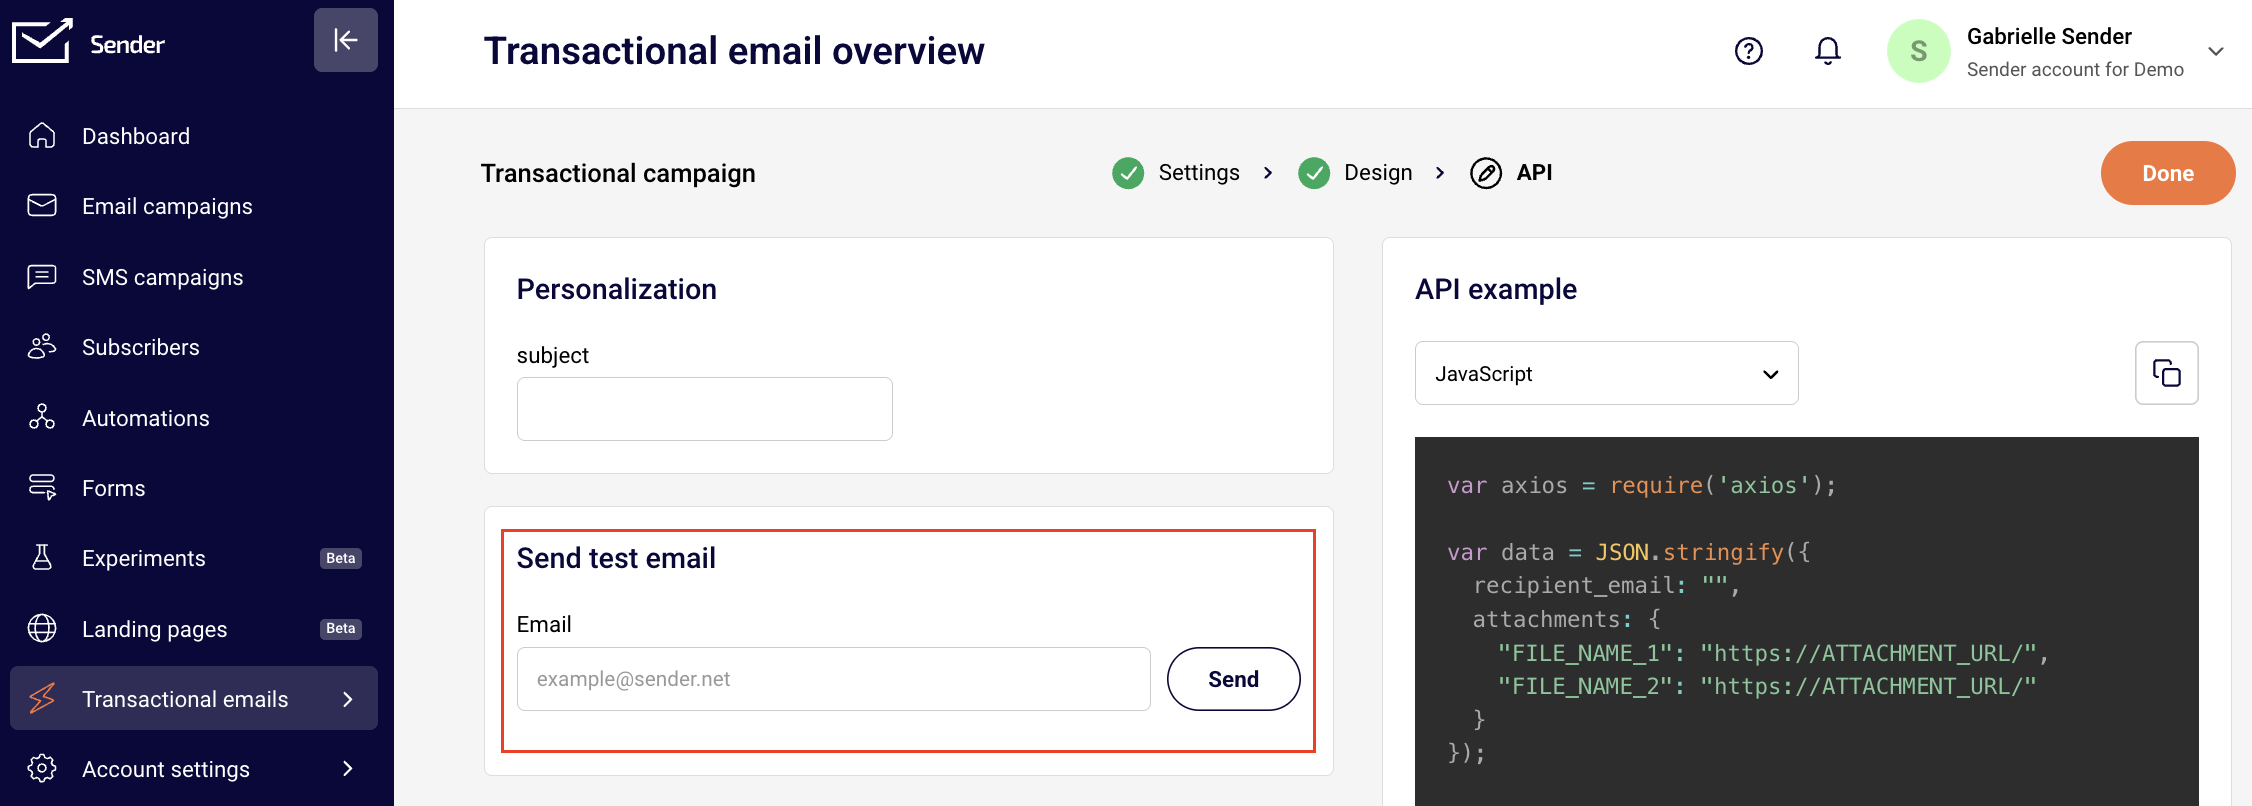
Sending a Test Email
Before going live, you can test your template:
- Go to the Transactional email overview page
- Enter your email address
- Click Send to receive a test email
Variables
Personalize your transactional emails using variables and dynamic content to create unique experiences for each recipient.
Using Liquid Tags
Liquid tags allow you to insert dynamic content into your emails. Liquid tags should be enclosed in double curly brackets:
Hello {{firstname}}, Your order {{order_id}} has been confirmed.
When sending via API, pass the personalization data:
{
  "to": {
    "email": "user@example.com",
    "name": "John"
  },
  "subject": "Order Confirmation",
  "html": "Hello {{firstname}}, your order {{order_id}} is confirmed.",
  "variables": {
    "firstname": "John",
    "order_id": "12345"
  }
}
Liquid tag rules:
- Must be enclosed in double curly brackets: {{variable}}
- May contain alphanumeric characters and underscores
- Must not start with a number or underscore
- Are case-sensitive: {{VAR}} is different from {{var}}
Conditional Content
Show different content based on conditions, e.g.:
{% if subscription_level == ‘premium’ %} You’re enjoying all premium features 🎉 {% else %} Upgrade your subscription to access premium features. {% endif %}
Common Issues and Solutions
Email not sending:
- Verify that your from email address matches your verified domain,
- Check that your API token or SMTP credentials are valid and active,
- Ensure you’re providing either HTML content, text content, or a template ID,
- Confirm your request format follows the API documentation exactly,
- Check that all required fields are included in your request.
Authentication errors:
- Confirm your API token is correct and hasn’t been regenerated
- Esure the API token has not expired (use “Forever” for transactional emails)
- For SMTP, verify your username and password are entered correctly and without extra spaces
- Check that your account has sending permissions and is not suspended
Recipient not receiving emails:
- Check if the subscriber status is active (not bounced, unsubscribed, or reported spam)
- Verify the recipient’s email address is valid and has no typos
- Look for bounce or spam complaint notifications in your activity log
- Check if your domain’s sending reputation is healthy
- Ensure SPF, DKIM, and DMARC records for your domain are properly configured and verified
Template issues:
- Verify your Campaign ID is correct in the API call
- Check that all liquid tags are properly closed with matching brackets
- Test liquid tag syntax with sample data before sending live
- Ensure custom fields referenced in liquid tags exist in your subscriber data, if not – set up default values.
API Error Codes
Understanding error codes helps you quickly identify and fix issues:
Code
Meaning
Common Solution
400
Bad request
Review your request format and ensure all JSON is valid
401
Unauthorized
Verify your API token is correct and properly formatted
403
Forbidden
Check your account permissions and sending limits
404
Not found
Verify the endpoint URL and Campaign ID are correct
422
Validation error
Review the error message for specific field issues
429
Too many requests
Reduce your request rate or implement exponential backoff
500
Server error
Retry your request after a brief delay
Common 422 Validation Errors
Error Message
What It Means
Solution
“From email must be verified”
The sender address doesn’t match your verified domain
Use an email address from your verified domain
“Recipient email required”
No recipient specified
Include at least one recipient in the “to” field
“Invalid email format”
Email address is malformed
Check for typos and proper email format (user@domain.com)
“Content required”
No email content provided
Include either “html” or “text” field in your request
“Campaign not found”
Invalid Campaign ID
Verify the Campaign ID from your template settings
“Rate limit exceeded”
Too many requests sent
Implement rate limiting in your application
Email status meaning
Track your email delivery with these status indicators:
Status
Description
What to do
Delivered
Email was successfully delivered to recipient’s server
Success – email reached the inbox
Opened
Recipient opened the email
Success – engagement tracked
Clicked
Recipient clicked a link in the email
Success – high engagement
Bounced
Permanent delivery failure (invalid address)
Remove or verify the email address
Spam reported
Recipient marked email as spam
Review your email content and sending practices
Unsubscribed
Recipient unsubscribed from emails
Respect their choice and remove from future sends
That’s it!
If you got stuck on a specific task or can’t find a way to execute a particular job, contact our support team via LiveChat or support@sender.net – we’re here to help 24/7.