

Importing subscribers
This guide explains how to import subscribers into Sender using the guided import wizard: upload or paste your data, map columns to subscriber fields, assign groups, control whether automations run, and review the results.
To start an import, go to Subscribers → Add subscribers. The wizard walks you through three steps: Add subscribers → Map fields → Organize & import. Everything else — progress tracking, error reports, and import history — happens after you click Start importing.
The same flow works whether you’re uploading your first list or migrating from another platform such as Mailchimp, GetResponse, Klaviyo, or Brevo. The wizard is fully mobile-friendly, so you can run an import from your phone.
Before You Start
- Verify your sending domain in Sender before importing, so you can send to your list as soon as the import finishes. See verify sending domain.
- Confirm you have consent. Every contact in the file must have explicitly opted in to receive email or SMS from you. Read more about CAN-SPAM and GDPR compliance.
- Get admin access to your source platform so you can export contacts, custom fields, tags, and suppression records.
- Document what you’re migrating — field names, field types, tag structures, and subscriber statuses.
- Decide which groups you need. You can select groups during the import, but creating them first makes the mapping step faster. Go to Subscribers → Groups → Create new group. See create contact groups.
- Custom fields are optional up front. You can create them mid-import from the Map fields step. Creating them in advance under Subscribers → Fields gives you more control over naming and field type. See manage subscriber fields.
Audit Your Source Platform
Contact fields — Document every field attached to your contacts in your source platform, including field names, data types (text, date, number, dropdown), and example values. In Sender these map to Fields under Subscribers → Fields, where the default fields are Email address, Phone number, First name, Last name, and Birthday.
Tags and lists — Record all tags, lists, or audience categories applied to your contacts. In Sender these map to Groups under Subscribers → Groups. If your source platform uses tags for individual attributes rather than audience segments, map those to custom Fields instead. See groups vs segments.
Subscriber statuses — Identify contacts marked as unsubscribed, bounced, or spam complaints. Import these separately and set the correct status so you never send to opted-out contacts. See subscriber statuses explained.
Custom field types — Note the data type of each custom field. Sender supports five types: Text, Date (YYYY-MM-DD), Datetime, Number, and Drop-down. Map each source field to the closest Sender type and reformat any values that don’t match before you upload.
Ways to add subscribers
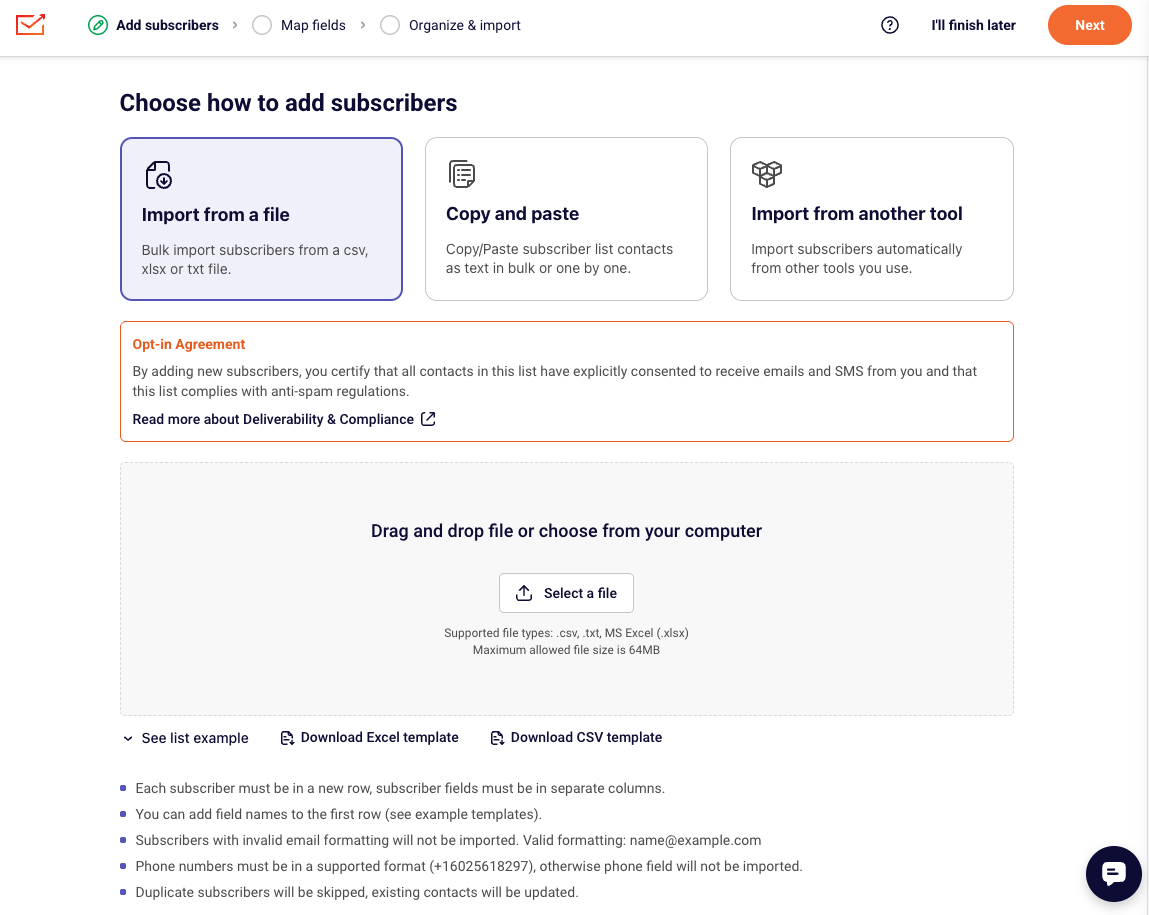
The first step of the wizard offers three methods. Pick the one that matches where your data lives.
Import from a file — Bulk import subscribers from a .csv, .xlsx, or .txt file. Use this for exports from another platform, spreadsheets, and any list over a few dozen contacts.
Copy and paste — Paste subscriber contacts as text, in bulk or one at a time. Use this for short lists, contacts collected offline, or a quick test batch.
Import from another tool — Connect an email marketing platform you already use and pull subscribers across automatically. Use this when you’d rather skip the export-and-upload cycle.
File and formatting requirements
Before you upload, check your file against these rules. Most import problems trace back to one of them.
| Requirement | Details |
| Supported file types | .csv, .txt, MS Excel (.xlsx) |
| Maximum file size | 64MB |
| Row structure | Each subscriber must be on a new row, and each subscriber field must be in its own column |
| Header row | Add field names in the first row so Sender can suggest mappings automatically |
| Email formatting | Invalid addresses aren’t imported. Valid formatting: name@example.com |
| Phone formatting | Use a supported international format that includes the country code of the number such as +16025618297, otherwise the phone field isn’t imported |
| Duplicates | Duplicate subscribers are skipped, and existing contacts are updated with the new values |
| Dates | Use YYYY-MM-DD or YYYY-MM-DD hh:mm:ss |
To start from a correctly structured file, use Download Excel template or Download CSV template on the upload screen, or expand See list example to view a sample layout. More detail in create import files and supported file types.
Steps to Import Contacts
Step 1 — Export and prepare your contact file
In your source platform, export your full contact list as a .csv or .xlsx file. Include every field you plan to migrate — email address, first name, last name, phone number, custom fields, and tags.
Make sure the first row contains column headers. Remove duplicate rows and obviously invalid addresses, and reformat dates to YYYY-MM-DD. If your source platform stores tags in a column, keep that column so you can use it during group assignment or map it to a custom field.
Platform-specific export instructions: import contacts from Mailchimp and import contacts from GetResponse.
Step 2 — (Optional) Create fields and groups in advance
Go to Subscribers → Fields → Create new field for any custom field that doesn’t exist in Sender yet, and pick the matching field type. Then go to Subscribers → Groups → Create new group for each list, audience, or tag category you want to recreate.
You can skip this step and create fields during mapping instead. Doing it in advance is worth it when you’re migrating a large field structure and want consistent naming.
Step 3 — Choose how to add subscribers and upload your file
Go to Subscribers → Add subscribers. On the Add subscribers step, select Import from a file, Copy and paste, or Import from another tool.
Read the Opt-in Agreement notice. By adding subscribers you certify that everyone on the list has explicitly consented to receive emails and SMS from you, and that the list complies with anti-spam regulations.
If you chose Import from a file, drag your file into the upload area or click Select a file. Upload progress is shown as the file transfers. When the upload finishes, click Next.
Step 4 — Map columns to subscriber fields
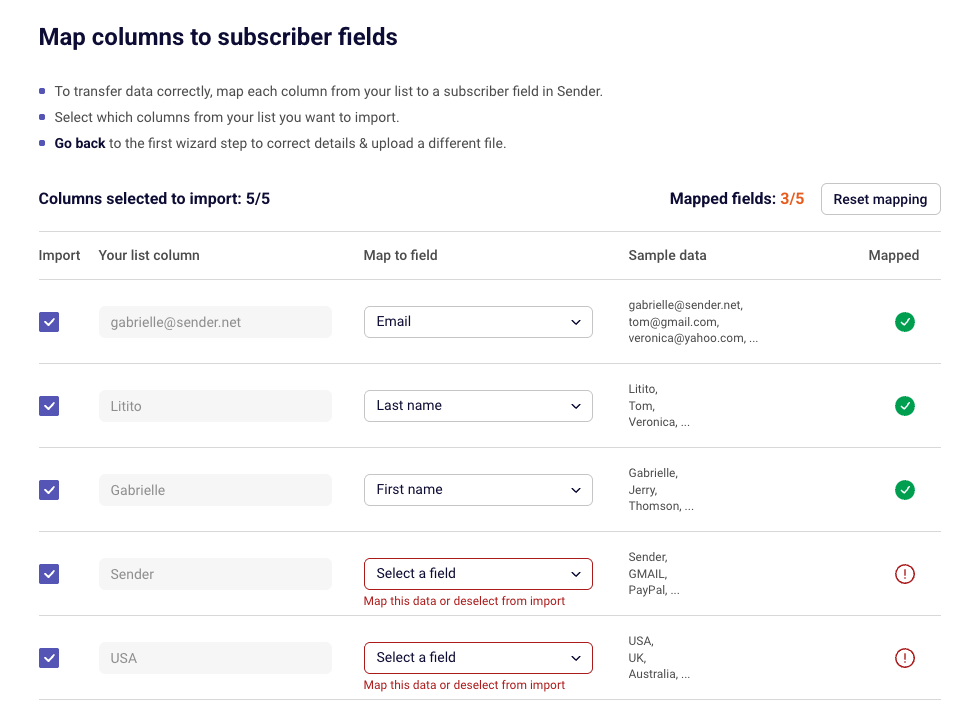
On the Map fields step, Sender shows every column from your file alongside sample data pulled from the first rows. Where a column header matches an existing field, the mapping is suggested for you.
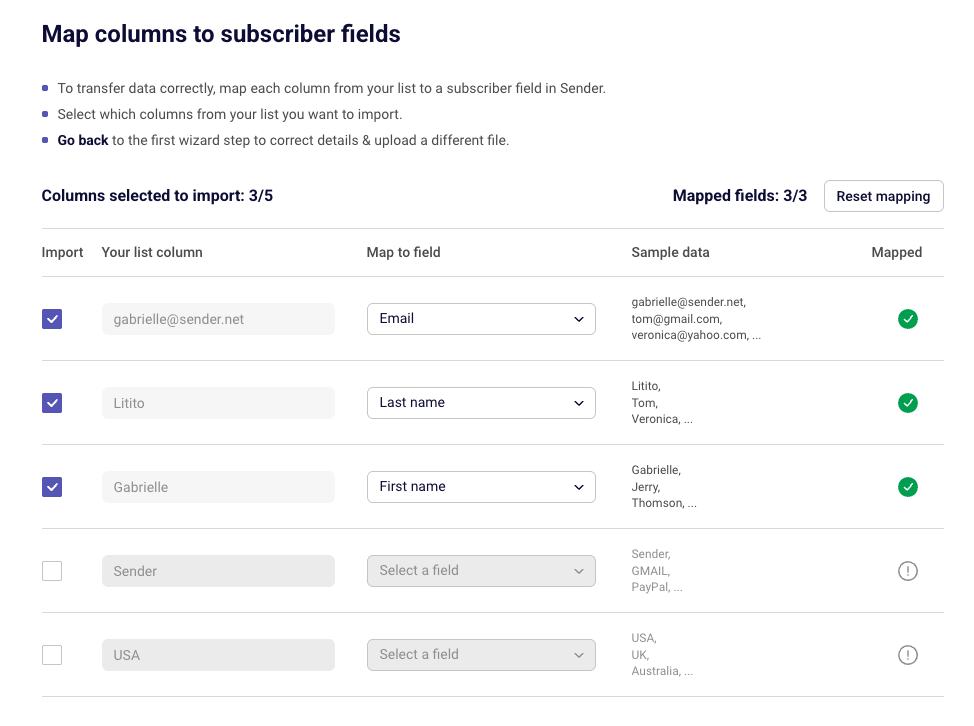
Choose which columns to import. Use the checkbox in the Import column to include or exclude each one. The counter at the top shows Columns selected to import — for example, 7/7.
Map each selected column. Open the Map to field dropdown and pick a field. Use Find by name to search when you have a long field list. Columns that still need attention are marked with a red icon and the message Map this data or deselect from import.
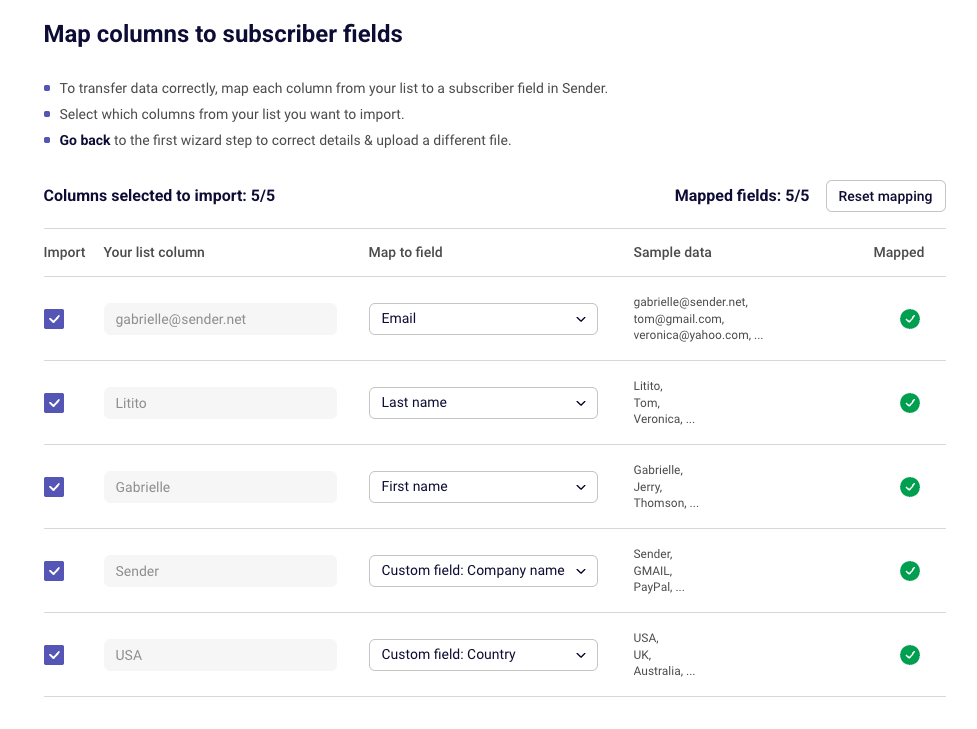
Create a field on the fly. Click + Create new field at the top of the dropdown to add a custom field without leaving the wizard. Once created, the column shows as Custom field: [name] and is marked as mapped.
Check your progress. The Mapped fields counter (for example, 3/7) tells you how many selected columns are ready. Click Reset mapping to clear everything and start again.
You can’t continue until every selected column is either mapped or deselected. When the counters match, click Next.
Step 5 — Organize and start the import
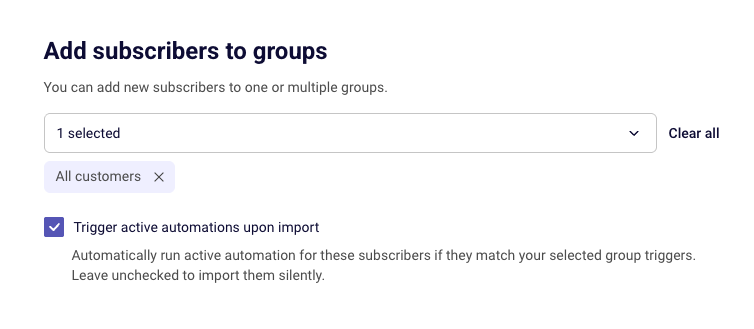
On the Organize & import step, open Select groups and choose one or more groups for the incoming subscribers. Every contact in this file is added to every group you select.
Then decide how automations should behave:
- Leave “Trigger active automations upon import” unchecked to import silently. No active automation runs for these subscribers, even if they match a group trigger. This is the safer choice for migrations and large historical lists.
- Check the box to run active automations for subscribers who match your selected group triggers. Use this when the import represents brand-new signups who should receive your welcome series.
Review your active workflows before enabling this — see automation triggers explained.
Click Start importing to begin. If you need to stop and come back, click I’ll finish later and your progress is saved so you don’t have to re-upload the file.
Step 6 — Track import progress
Imports run in the background. You can navigate to another page, start a campaign, or close the wizard without interrupting anything.
Status notifications appear in the bottom-right corner of the screen. Each import gets its own notification, so several imports can run at once and you can follow all of them at a glance.
- Pending import — the import is queued and shows the date and time it was created.
- Importing subscribers — a progress bar and a running count of contacts imported so far.
- Subscribers imported successfully — the import finished cleanly, with a View list button that takes you to your subscribers.
To stop an import, click Cancel on its notification. Subscribers already processed stay in your account — cancelling stops the remaining rows, it doesn’t roll back the ones that finished.




Step 7 — Review the results
When the import finishes, the results show how many subscribers were added, how many existing records were updated, and how many rows need review.
If an import is flagged as Review needed, open the import details straight from the status notification. From there, download the CSV report listing every affected subscriber and the specific issue for each row — usually invalid email formatting, an unsupported phone number format, a date that doesn’t match the expected format, or a duplicate.
Fix the flagged rows in your source file and re-import just those rows. Sender matches on email address, so re-importing a corrected row updates the existing record instead of creating a duplicate.
Step 8 — Import suppression records separately
Export unsubscribed, bounced, and spam-complaint contacts from your source platform as a separate file.
Run a second import with that file, mapping the email column to Email address. Leave the automation trigger checkbox unchecked so nothing fires for these contacts. After the import, update their status to Unsubscribed so they’re excluded from sends.
Repeat for bounced contacts if your source platform tracks them separately. Full details in migrating suppression lists.
Import statuses explained
| Status | What it means | What you can do |
| Pending | The import is queued and hasn’t started processing. The notification shows when it was created. | Cancel it before processing starts. |
| Importing | Subscribers are being added in the background. The notification shows a progress bar and running count. | Keep working elsewhere in Sender, or cancel — processed contacts stay imported. |
| Successfully imported | Every row was processed without issues. | Click View list to open your subscriber list. |
| Review needed | The import finished, but some rows had warnings or errors. | Open the import details and download the CSV report to see which rows were affected and why. |
| Cancelled | You stopped the import before it finished. | Subscribers processed before cancellation remain in your account. Re-import the remaining rows when ready. |
Import history
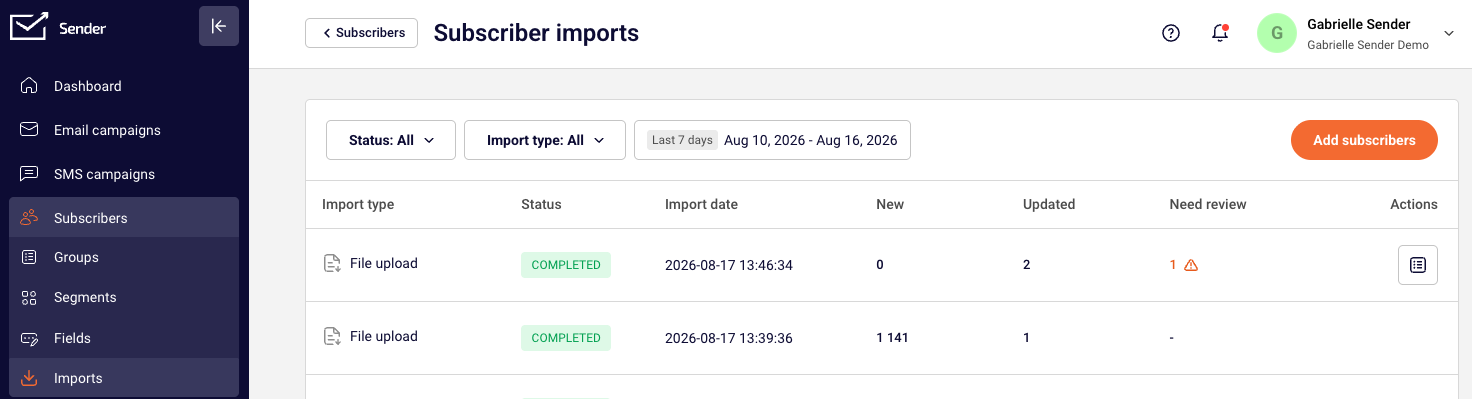
Every import is recorded under Subscribers → Imports.
The history page shows the import type, status, date, number of new subscribers, number of updated subscribers, and any issues for each import. Filter the list by status, type, or date to find a specific run.
You can download warning and error reports from previous imports here too — useful when you want to clean up data days after the import finished, or hand the report to someone else on your team.
Mapping Reference
Source platform contact fields → Sender Fields — Standard fields like email, first name, and last name map directly to Sender’s default fields. Custom fields (company name, city, membership tier) can be created in advance under Subscribers → Fields, or during mapping with + Create new field. Choose the type that matches your data: Text for free-form values, Date for YYYY-MM-DD dates, Datetime for timestamps, Number for numeric-only values, and Drop-down for fixed option sets. See contact attributes and custom fields.
Source platform lists or audiences → Sender Groups — Each list or audience corresponds to a Group. Select the groups you need on the Organize & import step. All contacts in the file are added to every selected group, so import one audience per file when you need different group assignments.
Source platform tags → Sender Groups or Custom Fields — Tags that represent audience segments (“VIP”, “Newsletter”) map to Groups. Tags that represent an attribute (“Lead source: Webinar”) work better as a custom Field with the tag value in its own column.
Source platform subscriber status → Sender subscriber status — Active contacts import as active. There’s no status column to map during import, so unsubscribed and bounced contacts need a separate file and a status update afterward.
Source platform date fields → Sender Date field — Sender accepts YYYY-MM-DD and YYYY-MM-DD hh:mm:ss. Convert dates in your export before uploading to avoid mapping errors.
Source platform phone numbers → Sender Phone number — Use international format with the country code, such as +16025618297. Numbers in other formats are skipped.
What Cannot Be Migrated Automatically
Subscriber engagement history — Open rates, click data, and engagement scores don’t transfer. Sender starts tracking engagement from your first send after the import.
Multiple tag assignments in a single file — If a contact belongs to several tags in your source platform, you can’t import all those assignments in one upload. Import one audience at a time, or restructure tags as custom field values in a single column.
Subscriber status during import — There’s no status column mapping. Active contacts import as active; suppression records need a separate import and a status update afterward.
Automation enrollment data — Which automations a contact was in, and their position in a sequence, can’t be transferred. Contacts enter Sender automations from the beginning based on new triggers. See rebuilding automations.
How to Test the Migration
Start with a small batch. Upload a file with 5–10 test contacts and run the full flow — mapping, groups, automation setting, results. Verify everything, delete the test contacts, then import the real list.
Verify contact count. Go to Subscribers and compare the total against the number of rows in your file, minus the header row. Check the results summary for how many were added versus updated.
Check field mapping accuracy. Open several subscriber records and confirm names, phone numbers, and custom field values landed in the right fields. Use Toggle fields on the subscriber list to show additional columns.
Confirm group assignment. Go to Subscribers → Groups and check the total for each group against what you expected.
Validate suppression records. Use the Email status filter on the subscriber list to confirm unsubscribed contacts carry the right status and are excluded from active counts.
Confirm automations behaved as expected. If you imported silently, check that no automation reports new entrants for that time window.
Import Tips
Import silently for migrations. Leave Trigger active automations upon import unchecked when moving a historical list. Existing subscribers shouldn’t receive your welcome series a second time.
Split large files. If your export is over 64MB, split it into smaller files and import them in batches. Removing unused columns also brings the size down. Because imports run in parallel, you can queue several batches and watch them all from the notifications.
Standardize dates and phone numbers before upload. Reformat dates to YYYY-MM-DD and phone numbers to international format in your spreadsheet first. This is the single biggest source of review-needed rows.
Use the templates. Download CSV template or Download Excel template on the upload screen gives you a correctly structured file to paste your data into.
Document your field mapping. Keep a reference table pairing each source field with its Sender field and type. It prevents mapping mistakes and speeds up future imports.
Clean the list before importing, not after. Removing invalid and long-inactive addresses protects your sender reputation from the first campaign onward. See maintain a clean subscriber list.
Common Issues
You can’t move past the Map fields step → One or more selected columns are unmapped. Look for the red Map this data or deselect from import message, then either assign a field or uncheck the column in the Import column. The Mapped fields counter should match the Columns selected to import counter.
A custom field is missing from the dropdown → It doesn’t exist yet. Click + Create new field at the top of the dropdown to add it without leaving the wizard, or use Find by name if you think it exists but can’t spot it in a long list.
The import shows Review needed → Some rows had warnings or errors. Open the import details from the notification, download the CSV report, fix the flagged rows in your source file, and re-import just those rows.
Phone numbers didn’t import → The numbers aren’t in a supported international format. Reformat them to include the country code, for example +16025618297, and re-import.
Date values didn’t import correctly → The values aren’t in YYYY-MM-DD or YYYY-MM-DD hh:mm:ss format. Reformat the column in your spreadsheet, save, and upload again.
Contacts appear as updated instead of new → Sender matches on email address. When an address already exists, the record is updated with the new field values rather than duplicated. This is expected behaviour.
An automation fired unexpectedly → Trigger active automations upon import was checked, and imported subscribers matched a group trigger. Pause the automation, then re-run future imports with the box unchecked.
The import notification disappeared → Notifications clear once dismissed. Go to Subscribers → Imports to see the status, counts, and reports for any import.
Your file won’t upload → Check the file type (.csv, .txt, .xlsx only) and confirm it’s under 64MB. Re-save from your spreadsheet application if the file was exported from an unusual source.
Suppressed contacts show as active → Unsubscribed or bounced contacts were imported without a status update. Locate them under Subscribers and change their status to Unsubscribed.
More troubleshooting in troubleshoot contact import.
FAQs
What file formats and sizes does Sender accept? .csv, .txt, and .xlsx (MS Excel), up to 64MB per file. Split larger exports into batches.
Can I run more than one import at a time? Yes. Each import gets its own status notification in the bottom-right corner, so you can queue several files and track them all separately.
Can I leave the page while an import runs? Yes. Imports process in the background, so you can keep working elsewhere in Sender. Check progress from the notification or from Subscribers → Imports.
Can I cancel an import? Yes — click Cancel on its status notification. Subscribers already processed stay in your account; the remaining rows are not imported.
Will importing contacts trigger my automations? Only if you check Trigger active automations upon import on the Organize & import step. Leave it unchecked to import silently, which is what most migrations need.
Can I create custom fields during the import? Yes. Click + Create new field in the Map to field dropdown. Creating fields in advance under Subscribers → Fields still gives you more control over naming and type.
How do I assign imported contacts to multiple groups? Select multiple groups from Select groups on the Organize & import step. Every contact in the file is added to all selected groups.
What happens to contacts that already exist in Sender? They’re matched by email address and updated with the new field values from your file. No duplicate record is created.
Can I import contacts from multiple platforms at once? Each import handles one file or one source. Export from each platform separately and run an import per file, assigning the right groups each time.
Can I pause an import and come back to it? Yes. Click I’ll finish later in the wizard and your progress is saved, so you don’t need to re-upload the file.
Where can I see previous imports? Go to Subscribers → Imports for the full history, including status, date, subscriber counts, issue counts, and downloadable reports.
Do I need to create groups before importing? No, but it helps. You can select existing groups during the import; creating them first keeps naming consistent across a migration.
If you got stuck on a specific task or can’t find a way to execute a particular job, contact our support team via LiveChat or support@sender.net – we’re here to help 24/7.