
Every day, malicious actors send billions of emails impersonating brands they don’t own. They forge domains, copy logos, and trick recipients into clicking links or wiring money. The defense isn’t a spam filter — it’s email authentication.
Email authentication is the set of standards that proves an email actually came from the domain it claims to. Without it, your messages can be spoofed by anyone, your deliverability suffers, and your customers become easy targets. With it, mailbox providers trust you, your emails reach the inbox, and bad actors hit a wall when they try to impersonate your brand.
This guide covers how the protocols work, how to set them up, how to monitor them, and how to avoid the mistakes that quietly break inboxing for thousands of senders every year.
This article is part of our Email deliverability guide.
What Is Email Authentication?
Email authentication is a collection of technical standards that verify the identity of an email sender. When a message arrives at a recipient’s mail server, those standards let the server confirm two things: the email genuinely came from the domain in the “From” address, and its contents weren’t tampered with along the way.
The reason authentication exists at all is that the original email protocol — SMTP — wasn’t designed with security in mind. SMTP will happily deliver a message claiming to be from any domain, with no built-in way to verify that claim. That gap is what spammers, phishers, and fraudsters have exploited for decades.
To close it, the email community developed five interlocking standards: SPF, DKIM, DMARC, ARC, and BIMI. Each solves a piece of the problem. SPF, DKIM, and DMARC form the required authentication baseline for bulk senders at Gmail, Yahoo, and Microsoft; ARC helps preserve authentication through forwarding, while BIMI adds optional verified-logo display once DMARC enforcement is in place.
When authentication fails, the consequences are immediate. Mailbox providers may quarantine the message, drop it into spam, or reject it outright. The cost is real: over 90% of cyberattacks start with email, and Proofpoint detected an average of 66 million business email compromise (BEC) attempts per month in 2024. Authentication is the line between being part of the solution and being part of the attack surface.
Why Email Authentication Matters in 2026
Authentication used to be optional. It isn’t anymore.
In February 2024, Gmail and Yahoo rolled out new sender requirements that mandate SPF, DKIM, and DMARC for any domain sending more than 5,000 messages a day to their users. Microsoft followed with similar enforcement in 2025. If your domain isn’t authenticated, you’re not just at risk of looking suspicious — you’re at risk of being silently filtered out of the inbox entirely.
Beyond deliverability, authentication delivers value across four dimensions:
Brand protection. Without DMARC enforcement, anyone can send email using your domain in the visible “From” field. That includes phishers targeting your customers, ex-employees impersonating your support team, and competitors running smear campaigns. Authentication makes exact-domain spoofing technically impossible.
Regulatory compliance. GDPR, CCPA, HIPAA, and PCI-DSS all touch on data integrity and communication security. While none of them name SPF or DMARC explicitly, demonstrating due diligence in protecting customer communications is increasingly part of audit conversations.
Customer trust. A BIMI-enabled inbox shows your verified logo next to every legitimate message. Senders who implement BIMI report measurable lifts in open rates and brand recognition because the visual cue tells recipients the email is real before they even read the subject line.
Operational visibility. DMARC reports give you a daily inventory of every service sending email on your behalf — including the ones you forgot about, the ones a former employee set up, and the ones bad actors are trying to abuse. For most organizations, the first DMARC report is also the first complete picture of their actual email footprint.
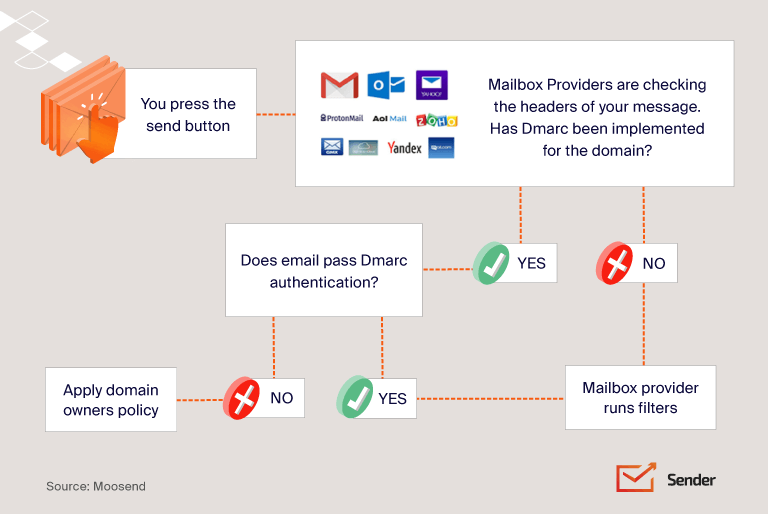
How Email Authentication Works
The authentication process happens in seconds, every time an email is delivered. Here’s what unfolds behind the scenes:
- Sender configuration. The domain owner publishes SPF, DKIM, and DMARC records in their DNS.
- Email send. The sending mail server signs the message with a DKIM signature and routes it through an authorized IP.
- Receiver lookup. The receiving mail server reads the message headers and queries the sending domain’s DNS.
- SPF check. The receiver verifies the sending IP is on the domain’s approved list.
- DKIM verification. The receiver fetches the public key from DNS and validates the cryptographic signature against the message contents.
- DMARC evaluation. The receiver confirms that SPF and/or DKIM passed and that the authenticated domain aligns with the visible “From” address.
- Delivery decision. Based on the results and the DMARC policy, the message is delivered, quarantined, or rejected.
A critical concept here is custom domain authentication. If you send through an ESP using a shared sending domain (like mail.someprovider.com), all your authentication signals point to the provider — not to your brand. Custom domain authentication means publishing the records under your own domain so mailbox providers see your domain reputation, not your provider’s. It’s a non-negotiable for any serious sender.
The Core Email Authentication Protocols
SPF (Sender Policy Framework)
SPF is the oldest of the modern authentication standards. It works by letting domain owners publish a list of IP addresses authorized to send email on their behalf. Receiving servers check the sending IP against this list — if it matches, SPF passes; if not, it fails.
A typical SPF record looks like this:
v=spf1 include:_spf.google.com include:sendgrid.net include:mailgun.org ~all
Each part has a specific job. v=spf1 declares the SPF version. The include: mechanisms reference the SPF records of services authorized to send for the domain. The final qualifier — ~all in this case — tells receiving servers what to do with mail from IPs not on the list.
The four SPF qualifiers control strictness:
- +all — Pass everything (effectively disables SPF; never use)
- ?all — Neutral (no recommendation)
- ~all — SoftFail (accept but mark as suspicious)
- -all — HardFail (reject)
Most senders should use ~all while building out their authentication setup, then move to -all once they’ve inventoried every legitimate sending source.
Where SPF falls short. SPF authenticates the Return-Path domain (the envelope sender), not the visible “From” address that recipients actually see. A phisher can send mail from a domain they control, pass SPF on that domain, and still display your domain in the “From” field. SPF on its own can’t stop this. There’s also the infamous 10 DNS lookup limit: if your SPF record (including all nested include: references) requires more than 10 lookups to resolve, it breaks entirely.
DKIM (DomainKeys Identified Mail)
DKIM solves a different problem: proving that a message wasn’t altered in transit and that it was genuinely signed by someone with access to your domain’s keys.
It works through public-key cryptography. The sending server attaches a digital signature to the message header, generated using a private key. The matching public key lives in your DNS. When the message arrives, the receiver fetches the public key, recreates the hash, and checks that it matches the signature. If anything in the message changed — body, subject, headers — the hash won’t match, and DKIM fails.
A DKIM signature header looks like this:
DKIM-Signature: v=1; a=rsa-sha256; d=example.com; s=selector1;
c=relaxed/simple; h=from:to:subject:date;
bh=MTIzNDU2Nzg5MDEyMzQ1Njc4OTAxMjM0NTY3ODkw=;
b=dzdVyOfAKCdLXdJOc9G2q8LoXSlEniSbav+yuU4zGeeruD00ls…
The key tags:
- d= — the signing domain
- s= — the selector (a label that identifies which key to use)
- bh= — the hashed message body
- b= — the digital signature itself
Selector strategy matters. A single domain can have multiple DKIM selectors, each with its own key pair. This lets you use different keys for different services (one for marketing, one for transactional) and rotate keys without breaking mail flow. Best practice is to rotate DKIM keys every 6 to 12 months and use a dual-selector setup so you can roll over without downtime.
Where DKIM falls short. Like SPF, DKIM authenticates a domain — but the domain it authenticates (the d= value) doesn’t have to match the visible “From” address. A phisher could DKIM-sign a message with their own domain while spoofing yours in the “From” field, and DKIM would pass.
DMARC (Domain-based Message Authentication, Reporting & Conformance)
DMARC is the protocol that finally ties everything together. It does three things SPF and DKIM can’t do alone (for DMARC explained in plain language, see our standalone breakdown):
- Domain alignment. DMARC requires that the domain authenticated by SPF or DKIM aligns with the domain in the visible “From” header. This closes the spoofing loophole.
- Policy enforcement. Domain owners can tell mailbox providers exactly what to do when authentication fails — none, quarantine, or reject.
- Reporting. DMARC generates aggregate reports (RUA) and forensic reports (RUF) that show every IP and service sending mail under your domain.
A DMARC record looks like this:
v=DMARC1; p=quarantine; rua=mailto:dmarc@yourdomain.com; ruf=mailto:dmarc-forensics@yourdomain.com; pct=100; adkim=r; aspf=r
The key tags:
- p= — policy (none, quarantine, or reject)
- rua= — address for aggregate reports
- ruf= — address for forensic reports
- pct= — percentage of messages the policy applies to (useful for gradual rollout)
- adkim= and aspf= — alignment mode for DKIM and SPF (r for relaxed, s for strict)
Alignment in practice. Imagine you send password reset emails. The visible “From” is noreply@yourbrand.com, but the Return-Path is bounces+abc123@em7842.esp-provider.com. Under strict alignment, the domains must match exactly — and DMARC would fail. Under relaxed alignment (the default), they only need to share the same organizational domain — and DMARC would still fail in this case because the organizational domains differ. The fix is to set up custom domain authentication with your ESP so the Return-Path becomes something like bounces@mail.yourbrand.com.
The DMARC policy ladder. Every DMARC deployment should follow a phased rollout:
- p=none — Monitor only. Collect reports for 2–4 weeks to identify legitimate senders you forgot about.
- p=quarantine — Send failing messages to spam. Use pct=10 to start, then ramp to 100.
- p=reject — Block failing messages entirely. The endgame for any serious authentication program.
Skipping straight to p=reject without a monitoring period is the single most common way to accidentally block your own legitimate email. Don’t do it.
ARC (Authenticated Received Chain)
ARC is the protocol most authentication articles skip — and it shouldn’t be.
The problem ARC solves: forwarders and mailing lists break authentication. When someone forwards your email through a Gmail filter, or a mailing list resends it to subscribers, the original SPF and DKIM signatures often fail. The forwarder is sending from a different IP (breaking SPF), and they may modify the subject line or add a footer (breaking DKIM).
ARC fixes this by creating a verified “chain of custody.” Each intermediate server adds an ARC seal recording the authentication status before they touched it. The final receiver can validate that chain and trust the original authentication result, even after multiple forwards.
You’ll care about ARC if you send to industries where mailing lists are common, if recipients frequently auto-forward, or if you see unexplained DMARC failures for forwarded mail.
BIMI (Brand Indicators for Message Identification)
BIMI is the visible payoff of doing email authentication right. Once your domain is at DMARC enforcement (p=quarantine or p=reject), BIMI lets you publish your logo in DNS so it appears next to every authenticated message in supporting inboxes.
BIMI doesn’t authenticate anything itself — it requires DMARC enforcement as a prerequisite. What it does is convert technical authentication work into a visible trust signal. Recipients see your logo next to your message, and a generic icon next to a phishing attempt impersonating you.
To deploy BIMI you need three things: DMARC at quarantine or reject, an SVG logo formatted to BIMI specifications, and (for Gmail and Apple Mail) a Verified Mark Certificate (VMC) from a CA like Entrust or DigiCert. BIMI is supported by Gmail, Yahoo, Apple Mail, and Fastmail — Microsoft Outlook is the notable holdout.
Other Authentication Mechanisms Worth Knowing
While SPF, DKIM, DMARC, ARC, and BIMI form the modern stack, several adjacent or legacy mechanisms still surface in audits and discussions:
- Reverse DNS / PTR records — Maps an IP back to a hostname. Many mailbox providers reject mail from IPs without valid reverse DNS. Not strictly authentication, but a baseline requirement.
- MTA-STS — Enforces TLS encryption between mail servers, preventing downgrade attacks and man-in-the-middle interception.
- TLS-RPT — Provides reporting on TLS delivery failures, complementing MTA-STS.
- Sender ID — A Microsoft-developed alternative to SPF that checks a different header. Largely deprecated but occasionally referenced.
- ADSP, VBR, iprev, DNSWL — Older or niche standards rarely encountered in modern setups but useful to recognize when reviewing legacy infrastructure.
SPF vs. DKIM vs. DMARC vs. ARC vs. BIMI
| Protocol | Purpose | What It Verifies | Protects Against | Requires |
| SPF | Authorize sending IPs | Sending IP is on approved list | Forged sender IPs | DNS TXT record |
| DKIM | Verify message integrity | Message content unchanged in transit | Tampering, forgery | DNS + signing keys |
| DMARC | Enforce alignment & policy | “From” domain matches authenticated domain | Exact-domain spoofing | SPF and/or DKIM |
| ARC | Preserve auth across hops | Original auth status through forwarders | Forwarding-related auth failures | SPF, DKIM, DMARC |
| BIMI | Visual brand indicator | Verified logo display | Visual brand impersonation | DMARC enforcement + VMC |
Step-by-Step: How to Set Up Email Authentication
A realistic deployment timeline runs 30 to 90 days. Rushing creates outages; dragging it out leaves you exposed. Here’s the sequence — and if you’re a Sender customer, you can also follow our help guide to set up SPF, DKIM, and DMARC in Sender for the platform-specific steps:
Step 1: Audit your sending infrastructure. List every system that sends email under your domain — your ESP, CRM, helpdesk, billing platform, transactional service, marketing automation, internal tools. Most teams discover sending services they’d forgotten existed. This list is the foundation; nothing else works until it’s complete.
Step 2: Inventory all sending domains and subdomains. Make sure you account for mail.yourdomain.com, notifications.yourdomain.com, support.yourdomain.com, and so on. Each subdomain needs its own authentication setup (see our walkthrough on verifying your sending domain for the practical steps).
Step 3: Publish your SPF record. Start with the services from your audit. Watch the 10 DNS lookup limit carefully — if you have many third-party senders, you may need SPF flattening tools to consolidate. Begin with ~all (SoftFail) until you’re confident every legitimate sender is included.
Step 4: Generate and publish DKIM keys. Each ESP and sending service will provide its own DKIM setup. Use 2048-bit keys (1024-bit is now considered weak) and assign distinct selectors per service. Publish public keys in DNS at selector._domainkey.yourdomain.com.
Step 5: Deploy DMARC at p=none. This is monitor-only mode. Set up a mailbox or DMARC reporting tool to receive rua reports. Don’t move on for at least 2–4 weeks — this is where you’ll find the unauthorized senders, misconfigured services, and forgotten subdomains.
Step 6: Analyze reports and fix gaps. Use a DMARC reporting platform (dmarcian, EasyDMARC, Postmark, or your own parser) to identify failures. Fix legitimate sources by getting them properly authenticated. Investigate suspicious sources for potential spoofing.
Step 7: Move to p=quarantine. Start with pct=10 to apply the policy to 10% of failing messages. Monitor for a week. Ramp to pct=25, then pct=50, then pct=100 as confidence grows.
Step 8: Move to p=reject. Once quarantine has been at 100% for several weeks with no legitimate failures, advance to reject. This is true DMARC enforcement.
Step 9: Add ARC and BIMI. ARC is largely automatic on the receiver side but worth verifying. BIMI requires the SVG logo, DNS record, and VMC certificate.
Testing & Monitoring Your Email Authentication
Before you trust your setup, verify it works.
Manual Gmail check. Send a test message to a Gmail address. Open it, click the three-dot menu, and select Show original. The header view will display SPF, DKIM, and DMARC results explicitly — all three should show PASS.
Free testing tools. MXToolbox, dmarcian Inspector, EasyDMARC, and Google Postmaster Tools all provide checkers for SPF, DKIM, and DMARC records. Run your domain through more than one — they occasionally disagree on edge cases, and cross-checking helps you spot real issues.
Ongoing monitoring KPIs. Track these metrics weekly:
- SPF pass rate (target: 99%+)
- DKIM pass rate (target: 99%+)
- DMARC pass rate (target: 95%+ for mature programs)
- Volume of unauthorized senders detected
- Spam complaint rate
- Sender reputation score in Google Postmaster Tools
A drop in any of these is an early warning that something has changed — a new third-party tool, a misconfigured update, or an active spoofing attempt.
Email Authentication Best Practices
A few practices separate mature authentication programs from the ones that look fine but quietly leak — and most of them overlap with practical steps to improve email deliverability more broadly:
- Use -all (strict SPF) only after a full sender inventory. A premature switch to -all will reject legitimate mail from a service you forgot.
- Rotate DKIM keys every 6–12 months with dual selectors. This limits exposure if a key is compromised and prevents downtime during rotation.
- Review policies quarterly. Email infrastructure changes constantly — new tools, retired services, organizational restructures. A quarterly review catches drift before it causes problems.
- Authenticate everything, not just marketing. Transactional, billing, helpdesk, and automated emails all need authentication. Attackers target the forgotten domains.
- Maintain a third-party sender registry. Document every external service authorized to send under your domain, who owns the relationship, and when authentication was last verified.
- Set up ISP feedback loops. Major mailbox providers offer feedback loops that report spam complaints. This data is gold for catching reputation issues early.
- Stay current on bulk sender requirements. Gmail, Yahoo, and Microsoft update their requirements regularly. What’s optional today may be mandatory next quarter.
Common Mistakes & Troubleshooting
The same handful of mistakes account for the majority of authentication failures. Watch for these:
Hitting the SPF 10-lookup limit. Each include: mechanism counts as a lookup, and many of those services include other services. Use SPF flattening tools to consolidate.
Forgotten subdomain coverage. A DMARC record on yourdomain.com doesn’t automatically cover subdomain.yourdomain.com unless you set the sp= (subdomain policy) tag. Many domains have authenticated apex domains and wide-open subdomains.
Strict alignment breaking ESP traffic. Most ESPs need relaxed alignment. Setting adkim=s or aspf=s without confirming compatibility breaks mail flow.
DKIM keys below 1024 bits. Older setups sometimes have 512-bit keys, which now fail at most receivers. Upgrade to 2048-bit immediately.
Jumping to p=reject without warm-up. This is the cardinal sin. Always run p=none long enough to see a full month of sending patterns.
Forgetting transactional and helpdesk emails. Marketing email gets the attention. The compromise often comes through the billing platform or customer support tool.
Email Authentication for Different Roles
Authentication isn’t a one-team project — different roles own different pieces.
Marketers focus on deliverability, BIMI deployment, sender reputation, and ensuring their ESP is properly authenticated under the brand domain. Authentication directly affects open rates and inbox placement.
Developers handle transactional sending integration, DKIM signing via API, webhook setup for delivery events, and authentication for application emails (password resets, receipts, notifications).
IT and security teams own DMARC enforcement, DNS management, anti-phishing posture, third-party sender governance, and compliance documentation. They also respond when authentication breaks.
The most effective programs treat authentication as cross-functional from day one, with a single owner coordinating across roles.
Frequently Asked Questions
A basic SPF and DKIM setup takes hours. A full DMARC rollout to enforcement typically takes 30 to 90 days because of the monitoring and ramp-up phases.
No. DMARC requires at least one of them to function. Best practice is to implement both.
Each ESP needs its own DKIM setup, and all of them need to be in your SPF record. DMARC alignment must be configured for each provider.
No, but failing authentication nearly guarantees you won’t reach the inbox. Authentication is necessary but not sufficient — content quality, list hygiene, and engagement also matter.
If you send more than 5,000 messages a day to Gmail or Yahoo addresses, you must have SPF, DKIM, DMARC at p=none minimum, one-click unsubscribe, and a spam complaint rate under 0.3%. Below that volume, the requirements are softer but still recommended.
With shared domain authentication, your ESP signs messages with their own domain. Your reputation gets bundled with every other customer’s. With custom domain authentication, messages are signed under your own domain, and your reputation is yours alone — for better or worse.
Closing Thoughts
Email authentication is one half of the equation — the other is sending through high deliverability infrastructure that maintains a clean IP reputation on your behalf.
A fully authenticated domain with DMARC at p=reject, BIMI displaying your logo, and clean reports is one of the strongest legitimacy signals you can send — and the strongest defense against brand impersonation. Start with the audit, set up SPF and DKIM, deploy DMARC at p=none, read the reports, fix what’s broken, and move to enforcement. The 30 to 90 days it takes will save you years of deliverability headaches.